Friday 28 December 2012


Gridview Rows and Columns Value Calculation using Javascript

ex. Just i tried with Invoice application Demo.


   <script type="text/javascript">
      function multiplication(obj)
      {    
          
          var cell = obj.parentNode;               
          var per=obj.value*(0.1236);
          if(obj.value!="")
          {
            cell.parentNode.cells[cell.cellIndex + 1].getElementsByTagName("input")[0].value = per;
            //alert(obj.value*(0.1236));
            cell.parentNode.cells[cell.cellIndex + 2].getElementsByTagName("input")[0].value=parseFloat(obj.value)+parseFloat(per);
                 
       }  
        var gv = document.getElementById('<%=GridView1.ClientID %>');
            var Amount = 0;
            var tax=0;
            var total=0;
            for (var i = 1; i < gv.rows.length - 1; i++){
                if (gv.rows[i].cells[1].childNodes[1].value != '') 
                {
                    Amount = parseFloat(Amount) + parseFloat(gv.rows[i].cells[1].childNodes[1].value);     //getting textbox value
                   
                      tax=parseFloat(tax)+parseFloat(gv.rows[i].cells[2].childNodes[1].value);
                    
                    total=parseFloat(total)+parseFloat(gv.rows[i].cells[3].childNodes[1].value);
                }
             
            }
            document.getElementById('<%=Label1.ClientID %>').textContent = Amount.toFixed(2);
           
              document.getElementById('<%=Label2.ClientID %>').textContent = tax.toFixed(2);
          
            
             document.getElementById('<%=Label3.ClientID %>').textContent = total.toFixed(2);
               
       }
      function Calculatesum()
      {
        var gv = document.getElementById('<%=GridView1.ClientID %>');
            var Amount = 0;
            var tax=0;
            var total=0;
            for (var i = 1; i < gv.rows.length - 1; i++){
                if (gv.rows[i].cells[1].childNodes[1].value != '') 
                {
                    Amount = parseFloat(Amount) + parseFloat(gv.rows[i].cells[1].childNodes[1].value);     //getting textbox value
                   
                      tax=parseFloat(tax)+parseFloat(gv.rows[i].cells[2].childNodes[1].value);
                    
                    total=parseFloat(total)+parseFloat(gv.rows[i].cells[3].childNodes[1].value);
                }
             
            }
            document.getElementById('<%=Label1.ClientID %>').textContent = Amount.toFixed(2);
           
              document.getElementById('<%=Label2.ClientID %>').textContent = tax.toFixed(2);
          
            
             document.getElementById('<%=Label3.ClientID %>').textContent = total.toFixed(2);
           
      }

    </script>


===================================================================>


       <asp:GridView ID="GridView1" AutoGenerateColumns="false" runat="server">
        <Columns>
          <asp:TemplateField HeaderText="Product Name">
         <ItemTemplate>
             <asp:Label ID="Label4" runat="server" Text='<%#Eval("productname") %>'></asp:Label>
         </ItemTemplate>
        </asp:TemplateField>    
       
        <asp:TemplateField HeaderText="Amount">
         <ItemTemplate>
             <asp:TextBox ID="TextBox1" onblur="multiplication(this);return false" runat="server"></asp:TextBox>
         </ItemTemplate>
        </asp:TemplateField>      
         <asp:TemplateField HeaderText="Tax">
         <ItemTemplate>
             <asp:TextBox ID="TextBox2" runat="server"></asp:TextBox>
         </ItemTemplate>
        </asp:TemplateField>      
         <asp:TemplateField HeaderText="Total">
         <ItemTemplate>
             <asp:TextBox ID="TextBox3" runat="server"></asp:TextBox>
         </ItemTemplate>
        </asp:TemplateField>
        </Columns>
        </asp:GridView>

Thursday 27 December 2012


Configuring ASP.NET 2.0 Application Services to use SQL Server 2000 or SQL Server 2005

One question I’ve seen asked a few times by people over the last few weeks is “how do I setup the new ASP.NET Membership, Role Management, and Personalization services to use a regular SQL Server instead of SQL Express?” This blog entry walks you though a few simple steps on how to-do this.

Quick Review: What are the new ASP.NET 2.0 Application Services?

ASP.NET 2.0 includes a number of built-in “building block” application services.  We call them “building blocks” because they are useful core frameworks for enabling super-common scenarios with web applications today – and as a result can provide significant productivity wins and time-savings for developers.

They include: a membership API for managing usernames/passwords and secure credential management, a roles API that supports mapping users into logical groups, a profileAPI for storing arbitrary properties about both authenticated and anonymous users visiting a web site (for example: their zipcode, gender, theme preference, etc), a personalizationAPI for storing control customization preferences (this is most often used with the WebPart features in ASP.NET 2.0), a health monitoring API that can track and collect information about the running state and any errors that occur within a web application, and a site navigation API for defining hierarchy within an application and constructing navigation UI (menus, treeviews, bread-crumbs) that can be context specific based on where the current incoming user is in the site.

The ASP.NET Application Service APIs are designed to be pluggable and implementation agnostic, which means that the APIs do not hardcode the details of where data is stored with them.  Instead, the APIs call into “providers”, which are classes that implement a specific “provider contract” – which is defined as an abstract class with a defined set of methods/properties that the API expects to be implemented.

ASP.NET 2.0 ships with a number of built-in providers including: a SQL Express provider for going against local SQL Express Databases, SQL 2000/2005 providers that work against full-blown SQL Servers, an Active Directory Provider that can go against AD or ADAM implementations, and in the case of site navigation an XML provider that can bind against XML files on the file-system.

The beauty of the model is that if you don’t like the existing providers that ship in the box, or want to integrate these APIs against existing data-stores you are already using, then you can just implement a provider and plug it in.  For example: you might already have an existing database storing usernames/passwords, or an existing LDAP system you need to integrate with.  Just implement the MembershipProvider contract as a class and register it in your application’s web.config file (details below), and all calls to the Membership API in ASP.NET will delegate to your code.

Default SQL Express Providers

Out of the box, most of the ASP.NET 2.0 application services are configured to use the built-in SQL Express provider.  This provider will automatically create and provision a new database for you the first time you use one of these application services, and provides a pretty easy way to get started without a lot of setup hassles (just have SQL Express on the box and you are good to go).  Note that SQL Express databases can also be upgraded to run in the context of full-blown SQL Server instances – so apps built using SQL Express for development can easily be upgraded into a high-volume, clustered, fail-over secure 8P SQL box when your app becomes wildly successful.

How do I change the providers to use SQL Server Instead of SQL Express?

If you want to use a full-blown SQL Server 2000 or SQL Server 2005 database instance instead of SQL Express, you can follow the below steps:

Step 1: Create or obtain a blank SQL database instance

In this step you’ll want to create or obtain a connection string to a standard SQL database instance that is empty.

Step 2: Provision your SQL database with the ASP.NET schemas

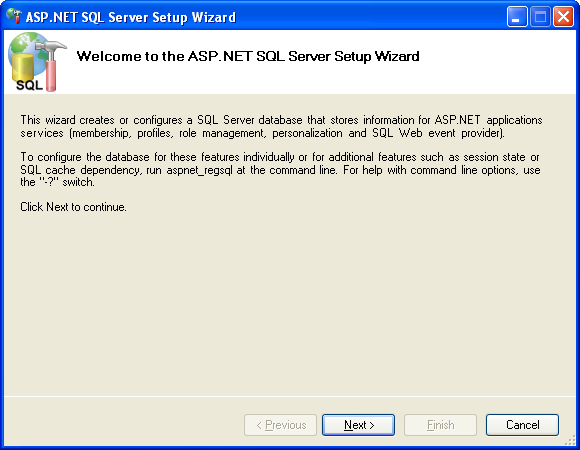
Open a command-line window on your system and run the aspnet_regsql.exe utility that is installed with ASP.NET 2.0 in under your C:\WINDOWS\Microsoft.NET\Framework\v2.0.xyz directory. 

Note that this utility can be run in either a GUI based mode or with command-line switches (just add a -? flag to see all switch options).

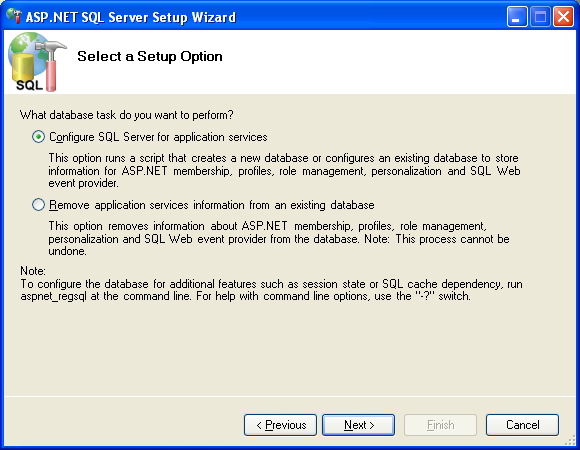
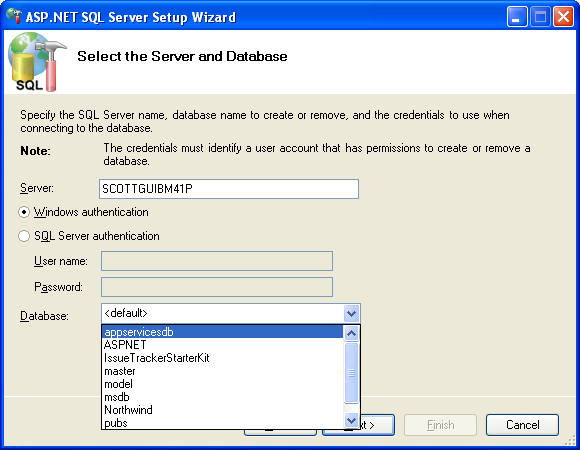
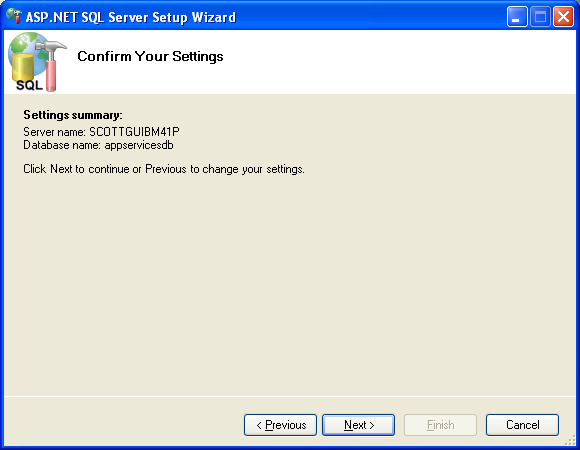
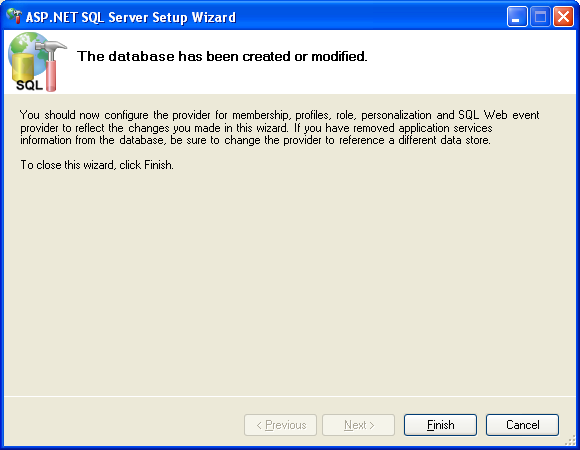
Using this wizard you can walkthrough creating the schema, tables and sprocs for the built-in SQL providers that come with ASP.NET 2.0.  The below screens show the step-by-step walkthrough of this:


Once you have finished walking through the wizard, all the database schema + sprocs to support the application services will have been installed and configured (note: if your DBA wants to see exactly what is going on behind the covers, we also ship the raw .sql files underneath the above framework directory, and your DBA can walkthrough them and/or run them manually to install the DB).

Step 3: Point your web.config file at the new SQL Database

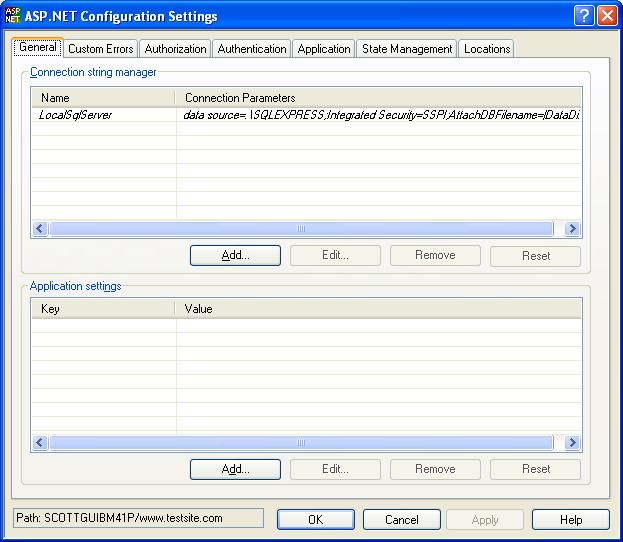
ASP.NET 2.0 now supports a new section in your web.config file called “<connectionStrings>” which (not too surprisingly) are used to store connection strings.  One nice thing from an administration perspective is that the new ASP.NET Admin MMC Snap-in now provides a GUI based way to configure and manage these:


ASP.NET 2.0 also now supports encrypting any section stored in web.config files -- so you can also now securely store private data like connectionstrings without having to write any encryption code of your own. 

ASP.NET 2.0 ships with a built-in connection string called “LocalSqlServer” which by default is configured to use a SQL Express database, and which by default the Membership, Roles, Personalization, Profile and Health Monitoring services are configured to use.

The easiest way to have your application automatically take advantage of your newly created SQL database is to just replace the connectionstring value of this “LocalSqlServer” setting in your app’s local web.config.

For example, if I created my database on the local machine in an “appservicesdb” database instance and was connecting using Windows Integrated security, I would change my local web.config file to specify this:

<configuration>

    <connectionStrings>
        <remove name=”LocalSqlServer”/>
        <add name="LocalSqlServer" connectionString="Data Source=localhost;Initial Catalog=appservicesdb;Integrated Security=True" providerName="System.Data.SqlClient"/>
    </connectionStrings>

</configuration>

Hit save, and all of the built-in application services are now using your newly created and defined SQL Server database.

Note: The one downside with the above approach is that I’m re-using the “LocalSqlServer” connection string name – which will feel weird if/when I deploy my database on another machine.  If I wanted to name it with my own connection string name, I could do this simply by adding a completely new connection-string, and then pointing the existing providers to use the new connection-string name in place of the default LocalSqlServer one. 

Hope this helps,

Thursday 20 December 2012


Tip - Missing Add Service Reference in Visual Studio 2008(and above)??


If we choose any Framework earlier than .NET Framework 3.0 while creating project or migrate an existing project from older version of Visual Studio, we might not find Add Service Reference in the context menu when you right click on the project. Here is a way to update to the framework version of the project and get Add Service Reference option in the context menu (Project should be saved before doing this) ,

Right click on the project and navigate to the following path,

Compile->AdvancedCompileOptions(button)->TargetFramework(dropdown)

Change the Framework version to .NET Framework 3.0 (or above)

Now we should be able to see Add Service Reference option!!!!!!


(or)

Project-->RightClick--> select Property Page--> Select Built tab -->
TargetFramework(dropdown)

Change the Framework version to .NET Framework 3.0 (or above)


How to add web reference in VS 2008 Project


There are numerous changes between VS 2005 and VS 2008.  One of the changes has to deal with the way you add a web reference in a project.  Here are the steps to add a web reference to a windows application in  VS 2008.  First step is to right click the project and select Add Service Reference.


The second step is to select the Advanced button at the bottom of the form:

 The third step is to click the Add Web Reference button to open the web reference dialog:

You are now able to add your web reference as before:


 Not as convenient as right clicking the project and adding the web reference but just need to drill down a little further.

Upload a file using ASP.Net file upload control and WCF


I came across a question last week on how we can upload a file using a WCF service, So thought of solving through an example.

Introduction

I came across a question last week on how we can upload a file on to third party server using a WCF service, So thought of solving that through an example. 

So In this example we will upload a pdf file using ASP.Net upload control and passing the details to the WCF and saving the file in the server.

Objective

So as discussed our objective is to upload a pdf file from a web application to a third party server using a WCF service.


Using the code

So lets start building our sample step wise.

Step 1: First of all we will build the web application that a user will use to upload a file using the asp.net upload control. So lets code our aspx page as shown below.


Step 2: Now on the code behind file we will write the code to upload the details on btnUpload_click, where we will first validate to restrict the file type to be pdf and size to a max of 40 MB.


So here we have made sure to validate the posted file size not to exceed 40 MB and and type to be pdf file.

Step 3: We can also do a validation using the custom validation control too as below


Step 4: So on button click we have called a method called upload which will help us call our wcf service and send the details to save it on the third party server.

protected bool Upload(HttpPostedFile file, long actualFileSize)
        {
            int filePosition = 0;
            int filePart = 16 * 1024; //Each hit 16 kb file to avoid any serialization issue when transfering  data across WCF

            //Create buffer size to send to service based on filepart size
            byte[] bufferData = new byte[filePart];

            //Set the posted file data to file stream.
            Stream fileStream = file.InputStream;

            //Create the service client
            FUWcfService.FileUploadServiceClient serviceClient = new FUWcfService.FileUploadServiceClient();

            try
            {
                long actualFileSizeToUpload = actualFileSize;
                //Start reading the file from the specified position.
                fileStream.Position = filePosition;
                int fileBytesRead = 0;

                //Upload file data in parts until filePosition reaches the actual file end or size.
                while (filePosition != actualFileSizeToUpload)
                {
                    // read the next file part i.e. another 100 kb of data 
                    fileBytesRead = fileStream.Read(bufferData, 0, filePart);
                    if (fileBytesRead != bufferData.Length)
                    {
                        filePart = fileBytesRead;
                        byte[] bufferedDataToWrite = new byte[fileBytesRead];
                        //Copy the buffered data into bufferedDataToWrite
                        Array.Copy(bufferData, bufferedDataToWrite, fileBytesRead);
                        bufferData = bufferedDataToWrite;
                    }

                    //Populate the data contract to send it to the service method
                    bool fileDataWritten = serviceClient.UploadFileData(
                        new FUWcfService.FileData { FileName = file.FileName, BufferData = bufferData, FilePosition = filePosition });
                    if (!fileDataWritten)
                    {
                        break;
                    }

                    //Update the filePosition position to continue reading data from that position back to server
                    filePosition += fileBytesRead;
                }
            }
            catch (FaultException fex)
            {
                //Log data to database or file system here
                return false;
            }
            finally
            {
                //Close the fileStream once all done.
                fileStream.Close();
            }
            return true;
        }

Step 5: Next configure the web.config file to set the httpRuntime tag to set the maxRequestLength otherwise we will not be able to upload a big file like 40 MB file.

Also the WCF service details that we are going to create next.


Step 6: Now lets start creating the WCF service too from our side. First lets have the data contract and the interface.


Here we have created an interface IFileUploadService and the data contracts.

Step 7: Now the implementation part of the interface


Step 8: Finally lets configure the service 


Step 9: So Now its time to test our sample. Run the sample and the service.

So we have selected a pdf file and on clicking the upload button the file gets uploaded and the data is sent to the server through the WCF service part by part [16kb with each hit] and is saved in the server.


And finally displays the success message with the size of the file that got uploaded.

Hope you all will like it. And this would help all.


Conclusion

So we saw how easily we can upload a file across a wcf service. Let me know if you need any other details on this regard.

Friday 14 December 2012

C#.net - Read Text from Image in C#.net

In this article i will show you how to read text from image by using OCR Components in C#.net.


What is OCR?
OCR (Optical Character Recognition) is the recognition of printed or written text characters by a computer. This involves photoscanning of the text character-by-character, analysis of the scanned-in image, and then translation of the character image into character codes, such as ASCII, commonly used in data processing.


OCR translates images of text, such as scanned documents, into actual text characters. Also known as text recognition, OCR makes it possible to edit and reuse the text that is normally locked inside scanned images. OCRworks using a form of artificial intelligence known as pattern recognition, to identify individual text characters on a page, including punctuation marks, spaces, and ends of lines.


First off, you need to have MS Office 2007 installed or later version. This is obviously a dependency if you develop an application to use the OCR capabilites in the field – it won’t work without Office installed. Furthermore, the OCRcapability doesn’t install by default when you install Office, you need to add a component called ‘Microsoft Office Document Imaging’ (MODI).


Instructions on how to add the required MODI component.


Step 1
Click Start, click Run, type appwiz.cpl in the Open box, and then click OK.


Step 2
Click to select the Office 2007 version that you have installed.


Step 3
Click Change.


Step 4
Click Add or Remove Features, and then click Continue.


Step 5
Expand Office Tools.


Click on Image for better View.


Step 6
Click Microsoft Office Document Imaging, and then click Run all from My Computer.


Click on Image for better View.


Step 7
Click Continue.


Now MODI Components installed on your Machine.lets create OCR Application in Visual Stdio.


Step 8
Create a Console Application and give the solution name as SolReadTextFromImage.


Step 9
Copy a Sample image file in Application BaseDirectory.(./bin/debug/SampleImage.JPG)


Click on Image for better View.


Step 10
Add a MODI Reference in our application.so we can use in our application for reading text from image.Right Click on project in Solution Explorer.right click onReferences,select the COM tab,then select Microsoft Office Document Imaging 12.0 Type Library.  


Click on Image for better View.


Step 11
The Code below will read text from image and store in text file,it is look like this
  1. #region Methods  
  2.   
  3.         /// <summary>  
  4.         ///  Read Text from Image and display in console App  
  5.         /// </summary>  
  6.         /// <param name="ImagePath">specify the Image Path</param>  
  7.         private static void ReadTextFromImage(String ImagePath)  
  8.         {  
  9.             try  
  10.             {  
  11.                 // Grab Text From Image  
  12.                 MODI.Document ModiObj = new MODI.Document();  
  13.                 ModiObj.Create(ImagePath);  
  14.                 ModiObj.OCR(MODI.MiLANGUAGES.miLANG_ENGLISH, truetrue);  
  15.   
  16.                 //Retrieve the text gathered from the image  
  17.                 MODI.Image ModiImageObj = (MODI.Image)ModiObj.Images[0];  
  18.                   
  19.   
  20.                 System.Console.WriteLine(ModiImageObj.Layout.Text);  
  21.   
  22.                 ModiObj.Close();  
  23.             }  
  24.             catch (Exception ex)  
  25.             {  
  26.                 throw new Exception(ex.Message);  
  27.             }  
  28.         }  
  29.   
  30.         /// <summary>  
  31.         ///  Read Text from Image and Store in Text File  
  32.         /// </summary>  
  33.         /// <param name="ImagePath">specify the Image Path</param>  
  34.         /// <param name="StoreTextFilePath">Specify the Store Text File</param>  
  35.         private static void ReadTextFromImage(String ImagePath, String StoreTextFilePath)  
  36.         {  
  37.             try  
  38.             {  
  39.                 // Grab Text From Image  
  40.                 MODI.Document ModiObj = new MODI.Document();  
  41.                 ModiObj.Create(ImagePath);  
  42.                 ModiObj.OCR(MODI.MiLANGUAGES.miLANG_ENGLISH, truetrue);  
  43.   
  44.                 //Retrieve the text gathered from the image  
  45.                 MODI.Image ModiImageObj = (MODI.Image)ModiObj.Images[0];  
  46.                  
  47.   
  48.                 // Store Image Content in Text File  
  49.                 FileStream CreateFileObj = new FileStream(StoreTextFilePath, FileMode.Create);  
  50.                 //save the image text in the text file   
  51.                 StreamWriter WriteFileObj = new StreamWriter(CreateFileObj);  
  52.                 WriteFileObj.Write(ModiImageObj.Layout.Text);  
  53.                 WriteFileObj.Close();  
  54.   
  55.                 ModiObj.Close();  
  56.             }  
  57.             catch (Exception ex)  
  58.             {  
  59.                 throw new Exception(ex.Message);   
  60.             }  
  61.         }  
  62.  
  63.         #endregion  
  64.   
  65.           

Step 12
Call both methods in main function,it is look like this
  1. static void Main(string[] args)  
  2.         {  
  3.             // Set Sample Image Path  
  4.             String ImagePath = AppDomain.CurrentDomain.BaseDirectory + "SampleImage.jpg";  
  5.   
  6.             ReadTextFromImage(ImagePath);  
  7.   
  8.             // Set Store Image Content text file Path  
  9.             String StoreTextFilePath = AppDomain.CurrentDomain.BaseDirectory + "SampleText.txt";  
  10.   
  11.             ReadTextFromImage(ImagePath, StoreTextFilePath);  
  12.         }  


Full Code
  1. using System;  
  2. using System.Collections.Generic;  
  3. using System.Linq;  
  4. using System.Text;  
  5. using System.IO;  
  6.   
  7.   
  8. namespace SolReadTextFromImage  
  9. {  
  10.     class Program  
  11.     {  
  12.         static void Main(string[] args)  
  13.         {  
  14.             // Set Sample Image Path  
  15.             String ImagePath = AppDomain.CurrentDomain.BaseDirectory + "SampleImage.jpg";  
  16.   
  17.             ReadTextFromImage(ImagePath);  
  18.   
  19.             // Set Store Image Content text file Path  
  20.             String StoreTextFilePath = AppDomain.CurrentDomain.BaseDirectory + "SampleText.txt";  
  21.   
  22.             ReadTextFromImage(ImagePath, StoreTextFilePath);  
  23.         }  
  24.  
  25.         #region Methods  
  26.   
  27.         /// <summary>  
  28.         ///  Read Text from Image and display in console App  
  29.         /// </summary>  
  30.         /// <param name="ImagePath">specify the Image Path</param>  
  31.         private static void ReadTextFromImage(String ImagePath)  
  32.         {  
  33.             try  
  34.             {  
  35.                 // Grab Text From Image  
  36.                 MODI.Document ModiObj = new MODI.Document();  
  37.                 ModiObj.Create(ImagePath);  
  38.                 ModiObj.OCR(MODI.MiLANGUAGES.miLANG_ENGLISH, truetrue);  
  39.   
  40.                 //Retrieve the text gathered from the image  
  41.                 MODI.Image ModiImageObj = (MODI.Image)ModiObj.Images[0];  
  42.                  
  43.   
  44.                 System.Console.WriteLine(ModiImageObj.Layout.Text);  
  45.   
  46.                 ModiObj.Close(false);  
  47.             }  
  48.             catch (Exception ex)  
  49.             {  
  50.                 throw new Exception(ex.Message);  
  51.             }  
  52.         }  
  53.   
  54.         /// <summary>  
  55.         ///  Read Text from Image and Store in Text File  
  56.         /// </summary>  
  57.         /// <param name="ImagePath">specify the Image Path</param>  
  58.         /// <param name="StoreTextFilePath">Specify the Store Text File</param>  
  59.         private static void ReadTextFromImage(String ImagePath, String StoreTextFilePath)  
  60.         {  
  61.             try  
  62.             {  
  63.                 // Grab Text From Image  
  64.                 MODI.Document ModiObj = new MODI.Document();  
  65.                 ModiObj.Create(ImagePath);  
  66.                 ModiObj.OCR(MODI.MiLANGUAGES.miLANG_ENGLISH, truetrue);  
  67.   
  68.                 //Retrieve the text gathered from the image  
  69.                 MODI.Image ModiImageObj = (MODI.Image)ModiObj.Images[0];  
  70.                  
  71.   
  72.                 // Store Image Content in Text File  
  73.                 FileStream CreateFileObj = new FileStream(StoreTextFilePath, FileMode.Create);  
  74.                 //save the image text in the text file   
  75.                 StreamWriter WriteFileObj = new StreamWriter(CreateFileObj);  
  76.                 WriteFileObj.Write(ModiImageObj.Layout.Text);  
  77.                 WriteFileObj.Close();  
  78.   
  79.                 ModiObj.Close(false);  
  80.             }  
  81.             catch (Exception ex)  
  82.             {  
  83.                 throw new Exception(ex.Message);   
  84.             }  
  85.         }  
  86.  
  87.         #endregion  
  88.     }  
  89. }  


Output


Click on Image for better View.


Download
Download source Code